Thursday, March 22, 2012

Zippered Wet Bag Tutorial


welcome to my first ever sewing tutorial!  so please, go easy on me if i make a mistake.

* please note that i am self-taught on my kenmore sewing machine that i got for christmas when i was in grade 8, and don't claim to be an expert by any stretch of the imagination!

i'm about to start potty-training my little girl and needed a solution for dealing with away-from-home accidents, so i started a search for a waterproof bag that i can put wet/dirty clothes in and hide discreetly back in my purse.  none of the wet bags i found (though i didn't search long) were the exact size i wanted and i also wanted a pocket on the front.  i've sewn wristlets, clutches, purses and bags before and looked into my memory to combine elements from each to make my own custom wet bag.
it could also be easily used for cloth-diapering and wet bathing suits, too!  or you could switch out the waterproof fabric for more cotton fabric and make a cute little non-waterproof bag instead!

for a bag with the finished measurements 10"x13" with a 5.5" strap and 7"x10" pocket, you will need (shown left to right in photo above):

- two 10"x14" pieces of waterproof liner (i used a vinyl tablecloth because that's what i had lying around but most tutorials suggest PUL, which stands for polyurethane laminated fabric, great for making cloth diapers as well)
- two 10"x14" pieces of cotton fabric for the outside
- one zipper (at least 14")
- one 4"x12" piece of cotton fabric for the handle (if you want one)
- two 8"x11" pieces of cotton fabric for the front pocket (again, if you want one)
- optional: a tag with your own logo to make it look professional ;)

use a 1/4" seam allowance unless noted otherwise.
to do all the cutting, sewing, ironing, photo-taking and note-making took me 2.5 hours from start to finish.

i highly recommend washing and pre-shrinking all fabric ahead of time as this is something that will probably need to be thrown in the wash many times.  you don't want to go through all the work making something only to have it shrink and warp when you wash it for the first time.

i also recommend ironing all of your pieces before you begin, and ironing after each step.  i used to be too lazy to dig my ironing board and iron out from the closet and wouldn't bother until i read somewhere that the difference between a sewing project looking homemade and professional is ironing.  my projects have looked way nicer since i've been making that extra effort!

start by preparing the strap (if you choose to include one, it's just as easily left out).
fold your 4"x12" piece of fabric in half lengthwise and iron to make a crease.  open it back up and fold the edges in to the centre line, ironing again to make them stay.  then fold in half and sew along the open edge (and the closed edge, too, if you want it to look more finished).  you should end up with about a 1"x12" strap, like in the photo above.  set aside for later.

next make your front pocket (if you choose to have one).  i needed mine to fit my plastic graco wet wipe container (measuring 8.5"x4.5"x0.75") that came with my first diaper bag.  as mom's know, accidents always require wet wipes!
take your two 8"x11" pieces of cotton, lay one on top of the other, right sides together.  sew along one of the 11" sides.  open and put right sides out, folded at the new seam, and iron flat.

sew a straight line across the top edge (photo above, on left).
for those of us without a serger machine, do the following: to finish the raw edges so that they won't fray and get little threads on everything you put in this pocket, run a zig-zag stitch along the 3 raw edges.  do this by keeping the raw edge of the fabric in the middle of the foot.  as the needle zig-zags left and right it will go off one edge of the fabric and catch the other edge of the fabric.
the first time i learned this trick i was amazed that you could finish edges this way without a serger machine and i was very excited about it.  it doesn't take much to excite me, apparently...
if you have a serger machine, serge the 3 raw edges.

to form the pocket, iron the 3 serged edges in a 1/4" and pin into place.  fold the top corners in so they don't poke out the top of your pocket.  if you wish for your bottom corners to have an angle, simply fold the bottom corners in toward the middle, iron, and pin into place.  the back should look something like the photo above on the left, and the front should look like the above right.
if you'd like the top edge of your pocket to close with velcro, now's the time to attach it.  sew one side to the back side of the pocket, center your pocket into position on one of your 10"x14" pieces of cotton, and sew the other side of the velcro to the outside of that piece so that they line up.  it would be a major pain to add it after the bag is all put together.

if you'd like to add a tag, now's the time to get it ready.
i made my own: i printed my little birdie logo onto iron-on transfer paper (you can buy it at staples, michaels, or even walmart, i think), cut it out, and ironed it onto a piece of ribbon.  make sure there's enough extra ribbon on both ends so that you can tuck in into a seam or beside a pocket and it will get sewn in and not just slide right out.

pin your pocket in the center of one of your 10"x14" pieces of cotton fabric.  tuck your tag in one side as far as you'd like it to stick out and pin into place.

sew the side and bottom edges of the pocket to the 10"x14" piece with a back-and-forth stitch at the beginning and end to keep it tightly in place, removing your pins as you go.  do not sew the finished top edge!  (sorry - had to say it!)
to sew nice, sharp corners on those bottom angles: when you get to your corner, stop sewing with the needle sticking into the fabric.  left your presser foot, turn your fabric to the new angle (see middle photo), lower your presser foot, and continue sewing.  don't be a hero and keep your machine sewing while trying to manoeuvre the fabric around, your lines will curve and it won't look as nice.  these are things i don't want to assume you all know because at one point i didn't either.

here is where i slid my wet wipe case into the pocket to make sure it fit.  it did.  i did a happy dance.

now it's time to deal with the zipper.  i like to add it now rather than at the end, i find it a whole lot easier.
this part might look wrong at first but just stick with me, it'll work.

we're putting the zipper along the 14" top of the bag.  lay the front piece of 10"x14" cotton (the one with the pocket) right side UP, then your zipper right side DOWN on top with the top edges lined up, and finally your waterproof fabric on top of that, right side DOWN (if there is a right side), top edge lined up.  pin together.  hopefully the pictures above help it make sense.
sew along that top edge, your zipper will probably be your guide in determining how close to the edge you will be sewing.
i find when sewing along this top edge the zipper pull-tab itself really gets in the way, i like to open the zipper half way, sew the first half.  then, stop my needle down in the fabric, lift my presser foot, carefully slide the zipper closed again, and continue sewing the rest of the way.

go ahead and open it up, put wrong sides together with the raw edge of the zipper out.  iron flat.

now to sew the other side.
place second 10"x14" piece of fabric right side UP, then pocket side DOWN on top of that with the undone edge of zipper lined up with bottom piece of fabric.  last, lay your second piece of waterproof fabric right side DOWN, top lined up with zipper and bottom piece of fabric.  pin together, sew together along top edge using that zipper pull-tab trick again.

fold pieces open, with waterproof fabric on back side of the zipper and cotton fabric on front side of zipper (with wrong sides of waterproof fabric and cotton fabric together) like in the photo above.

sew fabric along either side of the front of the zipper so that it all stays flat (it will also help keep the waterproof fabric liner from getting caught in the inside of the zipper).

now unzip the zipper a little over half way.  this will be helpful later when turning your bag right side out.
fold your strap in half and place it on top of the front piece of fabric, raw edges lined up.  pin into place.  i put mine 2" down from the zipper, the top edge lined up with the top edge of my pocket.

now, place right sides of cotton pieces together and right sides of waterproof pieces together with the zipper in the middle.  pin the edges together all the way around.
in the above right photo you can see i folded the zipper towards the cotton fabric side, right sides out.  if i make this again i'll fold it the other way, right sides together (as much as they can be) sandwiched between the waterproof fabric side.  it just ended up a little bunchier than i wanted, that's all.
make marks along bottom edge of waterproof liner, 3" in from edges.  sew all the way around the outside except leave the area between those marks open (see photo below for what it should look like).

trim off any excess fabric around the outside and clip all 4 corners close to the stitching so they aren't bunchy when you turn it right-side out.
reach in throw the hole you left open and turn the whole thing right-side out.  poke the corners out so they're nice and square.

you'll have an opening in the bottom of the waterproof fabric still, so fold the raw edges in and stitch however you'd like along that open edge - straight stitch, zig-zag (like i did in the photo above), hand stitch, whatever.  it'll just be on the inside of the bag so you won't see it.
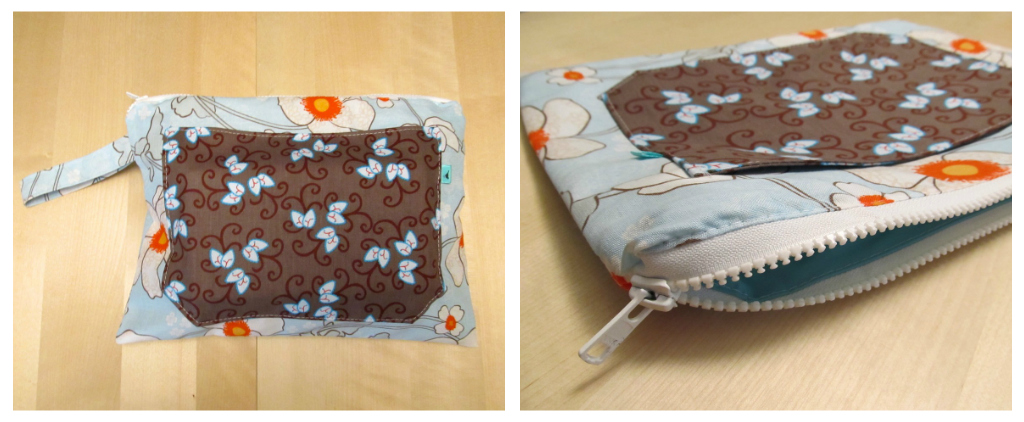
now tuck the waterproof liner into the inside of the cotton fabric so the zipper is along the top edge, and you're done!

fill your bag with whatever you like, an extra change of clothes, wet-wipes, whatever you'll need.  then, if an accident happens, and accidents always happen, you'll have a fresh set of clothes to change your kiddo into and somewhere waterproof to put the dirty ones.

the strap wasn't really necessary since i'll be keeping this baby in my purse, but it could come in handy if i were carrying it around.  this is where i did a happy dance when i finally tried fitting it into my purse.  like a glove!


an impromptu photo shoot with my daughter was instigated when she followed me to the only source of natural light in our house when i was taking pictures of the final product.  she was very excited to find her wet wipes in the front pocket, and spent some time practicing opening and closing the zipper.  i think she likes it!

and, while on the subject of her upcoming potty training, i also made this super-absorbant, waterproof, washable car seat protector pad for her car seat using this wonderful tutorial at home sweet homebodies. she's a smart cookie.  and yes, that stripe is crooked.  i really should invest in a square instead of winging it all the time, haha!

Thursday, March 15, 2012

Rainbows For Breakfast


last week my baby girl had her second birthday so we threw her a party over the weekend.
there's few things i love to do more than coming up with a theme, colour scheme and all the fun little details for my kids parties.  i get to call the shots (well, i always ask my husband his opinion but usually get a generic "sounds good" response) and i get to create all the graphics to use for the invitations, labels, cake toppers, goodie bags, etc.  that's the best part.  well, and seeing my kids smiling faces when i see them having fun at their party, of course!
pinterest was very inspirational as well, you can recognize many of the decorations and menu ideas from my parties pinterest board.


i long to have a program for my mac like illustrator or photoshop or one of those fancy programs that lets you create your own graphics with ease, but alas i do not have the funds for such things, so i've taught myself how to draw almost anything i put my mind to using simple old microsoft word.
(note: if you're planning on taking on such an endeavour yourself may i suggest choosing "word publishing layout" in your project gallery which you can find listed first under "file".  the regular "word document" that opens automatically will not give you as much freedom with the details.)
i made my invitation, got it looking just the way i wanted, saved a screen capture of it (command+shift+4 and hold your mouse to rectangle-select the image you want automatically saved to your desktop as a .jpg).  then i sent it to staples.ca online to be printed so i don't waste my own ink.


my theme: rainbows!  what little girl doesn't love rainbows?
my colour scheme: ahem... rainbows.
venue: my in-law's place, which is much bigger than our place - and conveniently right upstairs!
time of day: morning, therefore we would serve breakfast.  i've never been to a breakfast party, i thought it sounded pretty darn sweet and it wouldn't interfere with afternoon naps or be as expensive as serving dinner.  although i think it was.


no rainbow party is complete without some rainbow bunting and rainbow balloons.
i cut the triangles out of construction paper and sewed them together with my sewing machine onto a piece of shiny red ribbon.
i chose rainbow coloured balloons and made tissue paper pom-poms (thanks martha stewart for the tutorial) hoping the balloons would float to the cieling and the white pom-pom could be the cloud under the rainbow... my helium was too weak or my pom-poms were too heavy, so they got to hang out on counters, above lamps and on the stair railing post.


using word, again, i created a rainbow placemat for each of the younger guests (there were 9 kids altogether) and set the table with them; a place card, a placemat for eating on, and a take-home gift all rolled into one.  i had them printed on heavy cardstock at staples and had them laminated.  they were perfect, i was really happy with how they turned out.


i decided a menu would be fun, make it like a restaurant menu hanging over the food table (the kitchen island, actually) so people could see everything available.  i had two printed on one poster, cut them out and double-sized taped them together so people could read it from either side.  the eggs & sausages were an afterthought, as you may be able to tell.


the food!  it was awesome.  i had lots of help from my husband, my dad, and my in-law's.  and we made way too much so there were a lot of leftovers, which was also awesome ;)


my home-made place cards, which i had printed onto card stock to be nice and sturdy, so people would know what they were eating, as if they couldn't tell...


a cake and cupcakes seemed a little much that early in the morning so we opted for rice krispie cupcakes instead with rainbow coloured icing.


cupcake toppers are always fun, too.  i cut them out and pasted them onto slightly larger cut out circles of construction paper with a half-short skewer sandwiched in between.


my father-in-law was kind enough to take all of the photos for me.  one of his cameras has this great fish-eye lens which he used to capture the chaos in the living room after gifts were opened.  this was only half of the guests.  i'm so glad we didn't have the party in my tiny house!


and, of course, when the party ended, there were goodie bags waiting for all of our smaller guests with my little graphic of molly thanking her friends for coming to celebrate her birthday with us!

Friday, January 27, 2012

Our Playroom Is Done!

welcome to our play room tour!


before we painted the room (originally intended as an office) it was a very boring shade of painter's beige.  boooooring!


we found "rona eco" recycled low-voc interior paint in "ocean" for a great deal at rona.ca.  the colour looked nice on the container (they didn't have any swatches available, at least not that we could find) so we risked it!  i'm so glad we did, the colour turned out exactly how i'd hoped.  not too blue, not too green, not too grey, just a nice, warm, beachy colour.
we also painted the bulk-head white to match the ceiling instead of the colour of the walls.  i think it looks better.


here it is!
the kids love it, and we're really happy with how it turned out.


there's a comfy adult-sized chair (an ikea poang) near the entry for somewhere to kick back and relax with a book.  the kids have all their measurements since they were born on the height chart i made for them out of a recycled glass-front cupboard door and a drawing on paper (that i can change out for something else when they grow out of this drawing).  there is also an art wall, table & chairs, a kitchen, an easel and a fold-up barbie dollhouse.


our ikea expedit shelf fits perfectly in the closet-sized nook in the corner and houses more toys and storage bins.  shelving is key in a kids room, it was mismatched before looked messy, so although they aren't all the same still we thought we should at least keep them all the same pine/birch colour for a sense of cohesiveness.  favourite toys can make great decorations, too.


kids love fish, have you noticed that?  our goldfish now live in they playroom for the kids to see and feed.  there are alphabet magnets on a magnet board (which can also be used for all sorts of magnet games they have).  
although she's not even 2 (almost) my daughter loves barbies already.  she has a bunch so we found this fold-up doll house to play with them in.  i loved barbies as a kid, too, so i have fun playing with them with her.


see my last post about the clip-board art wall and picasso quote we put together for the kids to enjoy.  we didn't spring for the $50 top half to this kitchen, instead we hung up a $8.99 rail with hooks to hang pots and pans, oven mitts, and play-aprons.


when my 4-year-old son saw that we'd hung this menu above the table he was excited at the idea of his "customers" sitting and ordering from him so he could cook their food in his kitchen.  pretty cute.


also in this room is a staircase that leads to my in-law's house upstairs.  it's hard to tell in this picture but it was the same boring beige as the rest of the house before so we painted it all our in a bright crisp white.  it really brightened it up and looks more modern now, which we love.

thank you for joining me on the tour of our playroom.  i hope you've been inspired!

Wednesday, January 25, 2012

Kids Art Wall

we've recently combined our kids into one bedroom and turned the old bedroom into their new play room.  i've been having a lot of fun scouring pinterest for decorating ideas to make it fun and functional.  my latest project has been coming up with a way to display all the wonderful art my kids love to make.  usually it spends a week on our fridge and then gets bumped by something new and finds it's way on top of a shelf somewhere.  not ideal.
i thought, how cool would it be for the playroom to have a wall of my kids own artwork on display?  so off i went on searches of other people's ideas.  here are a few:

ikea tension curtain rods with clips
i like it, it makes the art easily interchangeable, but i find it a little bit chaotic for my neat-freak perfectionist tendencies.

uniform framed artwork
this is my favourite idea because it looks so neat and professional but it would take more effort to change the artwork in the frames and the artwork going on display isn't always a perfect 8x10.
{i'm unsure of the original source - if it's you please let me know so i can give credit where credit is due!}

cork boards
 i love this idea but have concerns about kids mixing with thumbtacks.
{source}

clipboards
this office has a very tidy clipboard wall set up, making all the snippets and clippings look organized.  i'll bet that would work great for kids artwork, too!
{again, i'm unsure of the original source, here's where i found it through pinterest: source}

so google it i did, and the winner is: clipboards!  of course!  perfectly interchangeable, neat and tidy in a line, and can fit art smaller or in different shapes than just your standard 8x10 paper.  i love it!

i LOVE this "every child is an artist" pablo picasso quote!
{source - complete with a tutorial for putting words on the wall}

using microsoft word i put together a couple of fonts for the picasso quote:

{"every child is an" and "pablo picasso" in the font "quicksand" (free download here)
and "artist" in the font "halo handletter" (free download here)}

i printed it out in the size i wanted it to be on my wall.  i have jennifer at insideways to thank for the "how-to" side of transferring my letters from paper to the wall using the home-made carbon paper technique (like she did on her diy scrabble tiles in this post) - thanks jen!

a little sharpie (for a nice crisp straight outline), some black paint (to fill the letters in... because it turned out sharpie and a painted wall weren't quite as made for each other as i'd hoped), and a little bit of patience later i had the quote up on the wall.  the hubby came in handy at hanging time and up went the  clipboards and some of the cutest artwork i've ever seen (even though you can't quite make it out in the photos i took...but trust me, it's cute!)

so, without further adieu...
using a couple of the above ideas - voila!  here is our new art wall in the play room!


we're so happy with how it turned out.
thanks to all those whose ideas led me to this finished product even though you had no idea you were even doing so!

stay tuned for a play room tour in the next few days!

Wednesday, January 18, 2012

Fizzy Fun

i found a simple recipe on a great UK blog i've only just discovered (where have you been all my life?) called Mini-eco.  the recipe is for a magic fizzy potion (think science fair volcano).

i decided i'd try it out with elliott while molly was napping.  here is how our adventure went:

 fill a clear cup half full of vinegar, add dish soap and food colouring
(blue is always elliott's colour of choice) and stir.
 add a heaping teaspoonful of baking soda.
watch in amazement as it grows blue foam.
after the amazement wears off, add yellow food colouring to see what will happen.
watch as the foam turns florescent yellow.
then stir in red food colouring, again to see what will happen.
drip the creepy red foam around for awhile.
get a call from grandpa to go play in the snow and run away.
ha ha, at least it was fun while it lasted!

you can find this and many other great ideas from mini-eco on her great blog or throughout my pinterest boards!

Monday, January 9, 2012

I Feel Calmer Already

want to feel relaxed, peaceful and romantic?  just peruse this tumblr page i happened upon:


it's full of wonderful photos, quotes and second-long movie clips.


(isn't that cute?)

i feel great, how about you?
where do you go to unwind?